Pte
Joseph Edward Baylis

Informations sur naissance
|
Date de naissance: 21/12/1879 |
|
Lieu de naissance: Waterloo, New South Wales, Australia |
Informations générales
|
Profession: Ouvrier |
Informations service militaire
|
Pays: Australia |
|
Force armée: Australian Imperial Force |
|
Rang: Private |
|
Numéro de service: 6234 |
|
Incorporation date: 16/03/1916 |
|
Incorporation nom de lieu: Goulburn, New South Wales, Australia |
|
Unités: — Australian Infantry, 3rd Bn. (Dernière unité connue) |
Informations sur décès
|
Date de décès: 04/10/1917 |
|
Lieu de décès: Molenaarelsthoek, Zonnebeke, Belgique |
|
Cause du décès: Killed in action (K.I.A.) |
|
Âge: 37 |
Mémorial
|
Ypres (Menin Gate) Memorial Panneau: 7L |
Distinctions et médailles 3
|
1914-15 Star Médaille |
|
British War Medal Médaille |
|
Victory Medal Médaille |
Points d'intérêt 3
| #1 | Lieu de naissance | ||
| #2 | Lieu d'enrôlement | ||
| #3 | Lieu du décès (approximatif) |
Mon histoire
Joseph was born in Sydney, New South Wales in 1879. He worked as a labourer in Sydney and was married to Bessie Margaret Sloyan in 1913. The couple had two daughters; Margaret Manuela and Irene Joyce. In March 1916 Joseph enlisted in Goulburn. In September 1916 he sailed from Sydney to Plymouth on the HMAT Euripides. Private Joseph Edward Baylis served in the 3rd Battalion Australian Infantry. Which was part of the 1st Brigade, of the 1st Australian Division. On board whilst training with Private Barclay for a boxing tournament, he accidentally hit a post. He was admitted to hospital, suffering from a simple transverse fracture of both bones of the left forearm.
Although most official military documents record Joseph Baylis’ death on 6 October 1917, witness testimonies in his Red Cross File state that joseph fell on 4 October 1917, when the 3rd Battalion advanced on the Broodseinde Ridge. At the moment Joseph was the batman of 2nd Lt. Christoe, an officer of the 3rd Battalion.
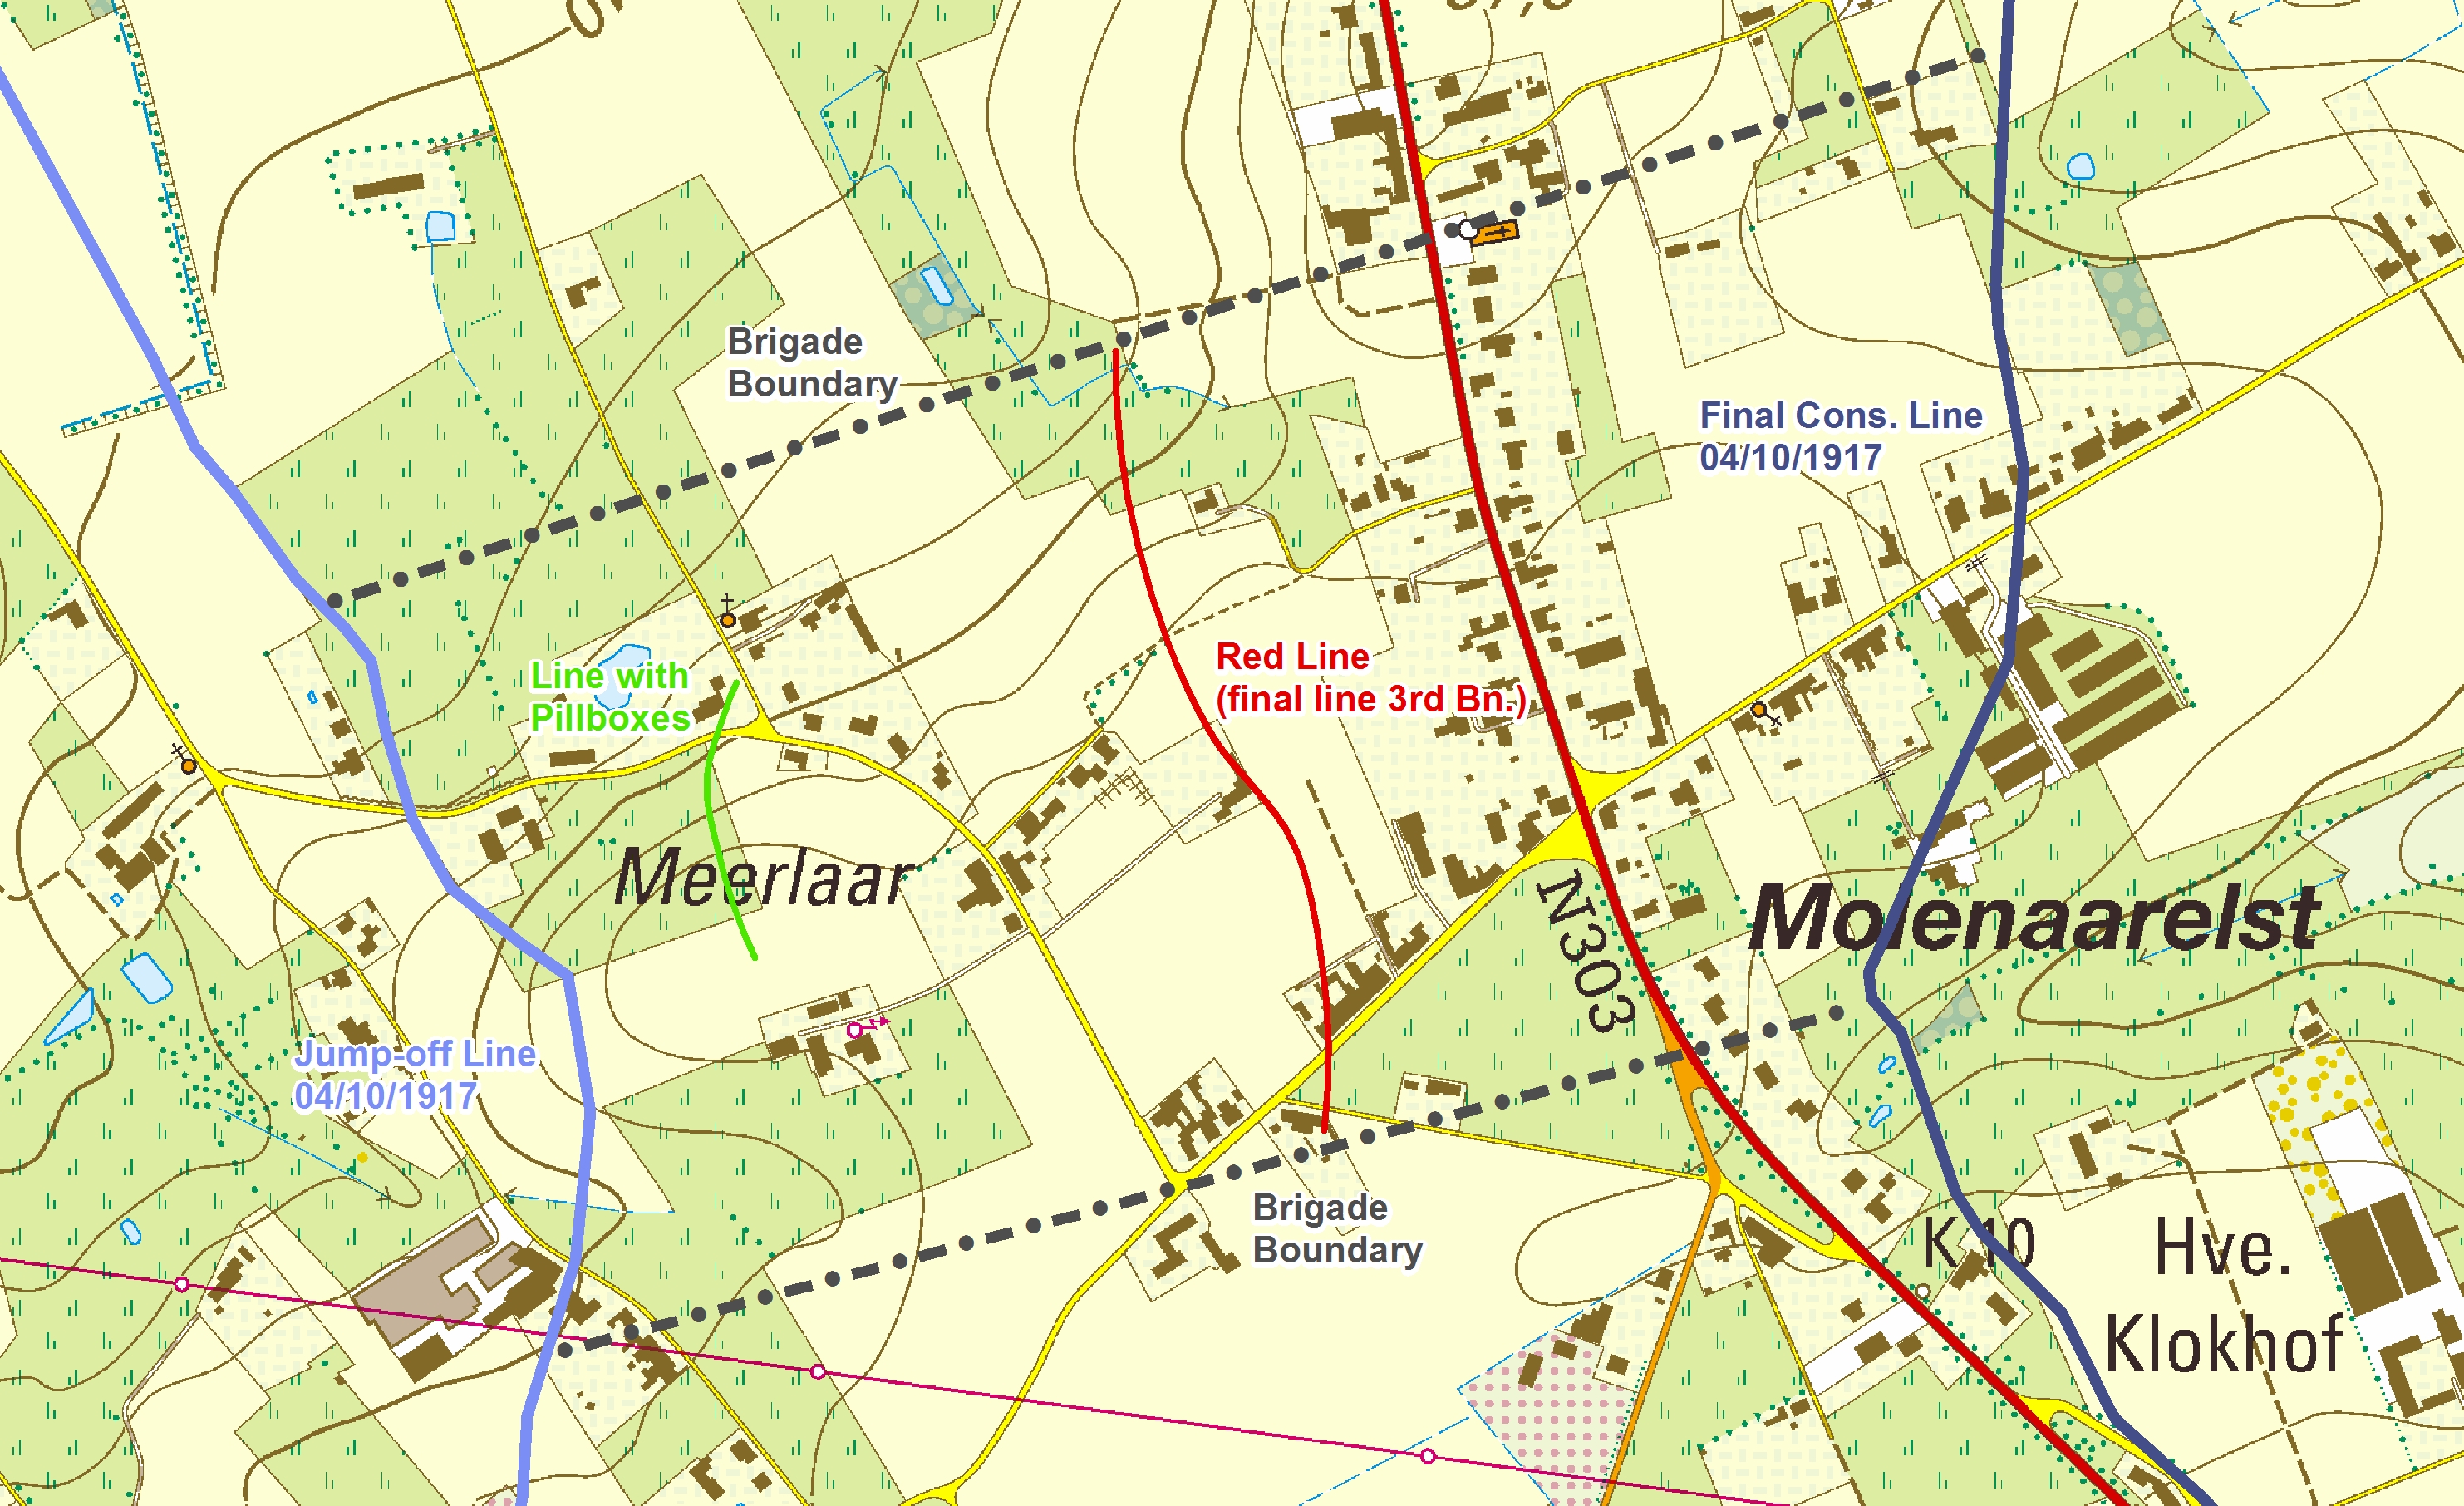
On the 4th of October 1917 the 1st Australian Division participated in the Battle of Broodseinde, a phase of the Third Battle of Ypres. Two brigades were to take part in the attack: the 1st and 2nd Brigade. The 3rd Battalion would advance first, with the 8th Battalion on the left and the 8th Devons on the right, and take the first objective. The 1st and 4th Battalion would then pass through the 3rd and capture the second objective.
At 2 am on the day of the battle, the 3rd Battalion moved into position near the front line. Their progress was slowed down by the mud and occasional shells and indirect machinegun fire. They eventually arrived at the jumping-off lines at 4 am. While the Australians were waiting for zero hour, the Germans suddenly opened fire and shells landed on the 1st Brigade, resulting in some casualties. This occurred at 5.30 am and was part of a counterattack the Germans had prepared for 6.10 am. However, this attack was never carried out. The 3rd Battalion advanced swiftly, despite some opposition, and was able to push the Germans back. In their pursuit of the retreating Germans, they passed by their objective. Nevertheless, they were soon reorganised and the consolidation of the first objective, the Red Line, began at 7 am. At 8 am, the 1st and 4th Battalion passed through the 3rd and were able to capture the second objective. Throughout the rest of the day, the Germans heavily shelled the 3rd Battalion’s positions. Eventually, on the 5th of October, the 3rd Battalion was relieved.
Private Jospeh Edward Baylis was killed in action on the 4th of October 1917, when the 3rd Battalion advanced on Molenaarelsthoek on the Broodseinde Ridge. He has no known grave and Joseph is commemorated on Ypres Memorial (Menin Gate) Bay 7 panel L.
Although most official military documents record Joseph Baylis’ death on 6 October 1917, witness testimonies in his Red Cross File state that joseph fell on 4 October 1917, when the 3rd Battalion advanced on the Broodseinde Ridge. At the moment Joseph was the batman of 2nd Lt. Christoe, an officer of the 3rd Battalion.
On the 4th of October 1917 the 1st Australian Division participated in the Battle of Broodseinde, a phase of the Third Battle of Ypres. Two brigades were to take part in the attack: the 1st and 2nd Brigade. The 3rd Battalion would advance first, with the 8th Battalion on the left and the 8th Devons on the right, and take the first objective. The 1st and 4th Battalion would then pass through the 3rd and capture the second objective.
At 2 am on the day of the battle, the 3rd Battalion moved into position near the front line. Their progress was slowed down by the mud and occasional shells and indirect machinegun fire. They eventually arrived at the jumping-off lines at 4 am. While the Australians were waiting for zero hour, the Germans suddenly opened fire and shells landed on the 1st Brigade, resulting in some casualties. This occurred at 5.30 am and was part of a counterattack the Germans had prepared for 6.10 am. However, this attack was never carried out. The 3rd Battalion advanced swiftly, despite some opposition, and was able to push the Germans back. In their pursuit of the retreating Germans, they passed by their objective. Nevertheless, they were soon reorganised and the consolidation of the first objective, the Red Line, began at 7 am. At 8 am, the 1st and 4th Battalion passed through the 3rd and were able to capture the second objective. Throughout the rest of the day, the Germans heavily shelled the 3rd Battalion’s positions. Eventually, on the 5th of October, the 3rd Battalion was relieved.
Private Jospeh Edward Baylis was killed in action on the 4th of October 1917, when the 3rd Battalion advanced on Molenaarelsthoek on the Broodseinde Ridge. He has no known grave and Joseph is commemorated on Ypres Memorial (Menin Gate) Bay 7 panel L.
Sources 7
|
"Passchendaele The Day-by-Day Account", McCarthy C., Uniform, 2018, page 110 - 111 Sources utilisées |
|
AIF project https://www.aif.adfa.edu.au/showPerson?pid=16997 Sources utilisées |
|
Australian War Memorial https://www.awm.gov.au/advanced-search?query=Baylis+6234 Sources utilisées |
|
CWGC https://www.cwgc.org/find-war-dead/casualty/1597592/baylis,-joseph-edward/ Sources utilisées |
|
Service Records https://recordsearch.naa.gov.au/SearchNRetrieve/Interface/DetailsReports/ItemDetail.aspx?Barcode=3059465&isAv=N Sources utilisées |
|
The Long Long Trail http://www.longlongtrail.co.uk/army/order-of-battle-of-divisions/1st-australian-division/ Sources utilisées |
|
War Diary https://www.awm.gov.au/collection/C1346493 Sources utilisées |