Pte
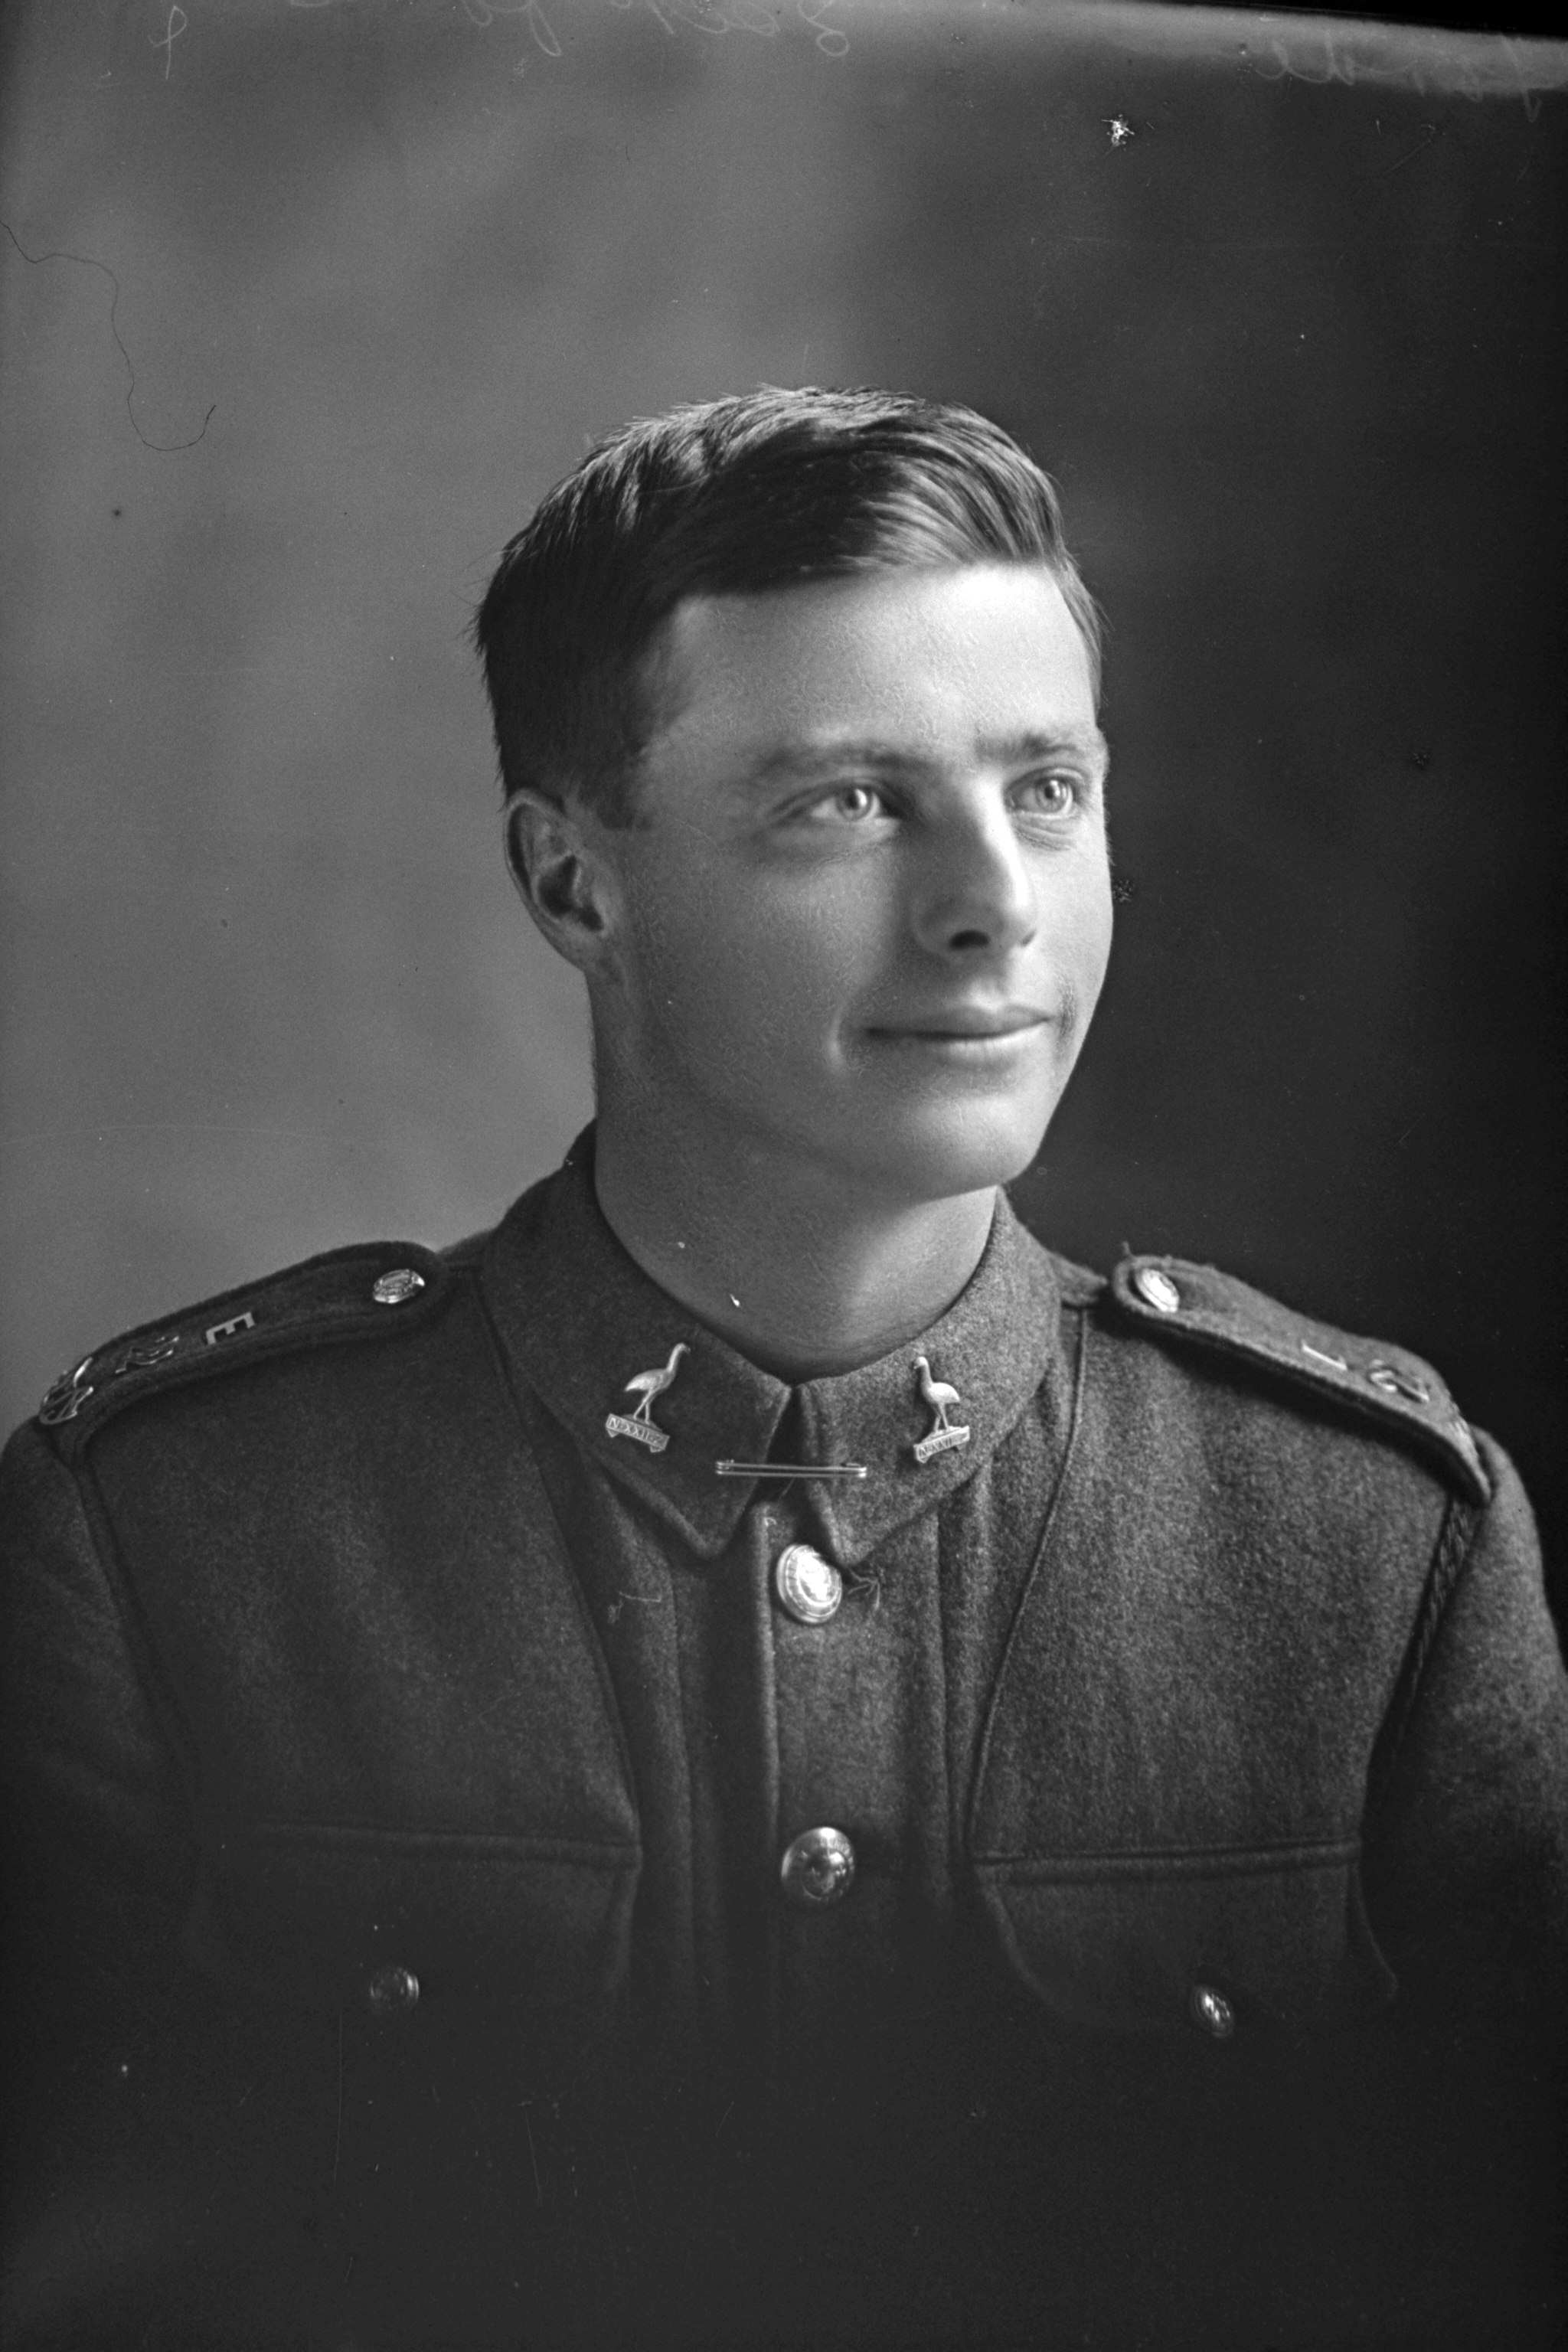
Norman Arthur Forde
Informatie over geboorte
|
Geboortedatum: 24/01/1896 |
|
Geboorteplaats: Marrickville, Sydney, New South Wales, Australië |
Algemene Informatie
|
Beroep: Monteur |
Informatie legerdienst
|
Land: Nieuw-Zeeland |
|
Strijdmacht: New Zealand Expeditionary Force |
|
Rang: Private |
|
Service nummer: 38679 |
|
Dienstneming datum: 13/10/1916 |
|
Dienstneming plaats: Auckland, Auckland, Nieuw-Zeeland |
|
Eenheden: — Wellington Regiment, 1st Bn. (Laatst gekende eenheid) |
Informatie over overlijden
|
Datum van overlijden: 03/10/1917 |
|
Plaats van overlijden: Calgary Grange, 's Graventafel, België |
|
Doodsoorzaak: Killed in action (K.I.A.) |
|
Leeftijd: 21 |
Gedenkplaats
|
Tyne Cot Memorial Paneel: New Zealand Apse nr. 6 |
Onderscheidingen en medailles 2
|
British War Medal Medaille — 12/10/1921 |
|
Victory Medal Medaille — 23/08/1922 |
Points of interest 3
| #1 | Geboorteplaats | ||
| #2 | Dienstneming plaats | ||
| #3 | Plaats van overlijden (bij benadering) |
Mijn verhaal
Private Forde Norman Arthur served in the Wellington Regiment 1st Battalion, part of the 1st New Zealand Brigade of the New Zealand Division. The Division was sent to the Ypres area late September 1917. They were to participate in the Third Battle of Ypres, which had been raging since the 31st of July 1917.
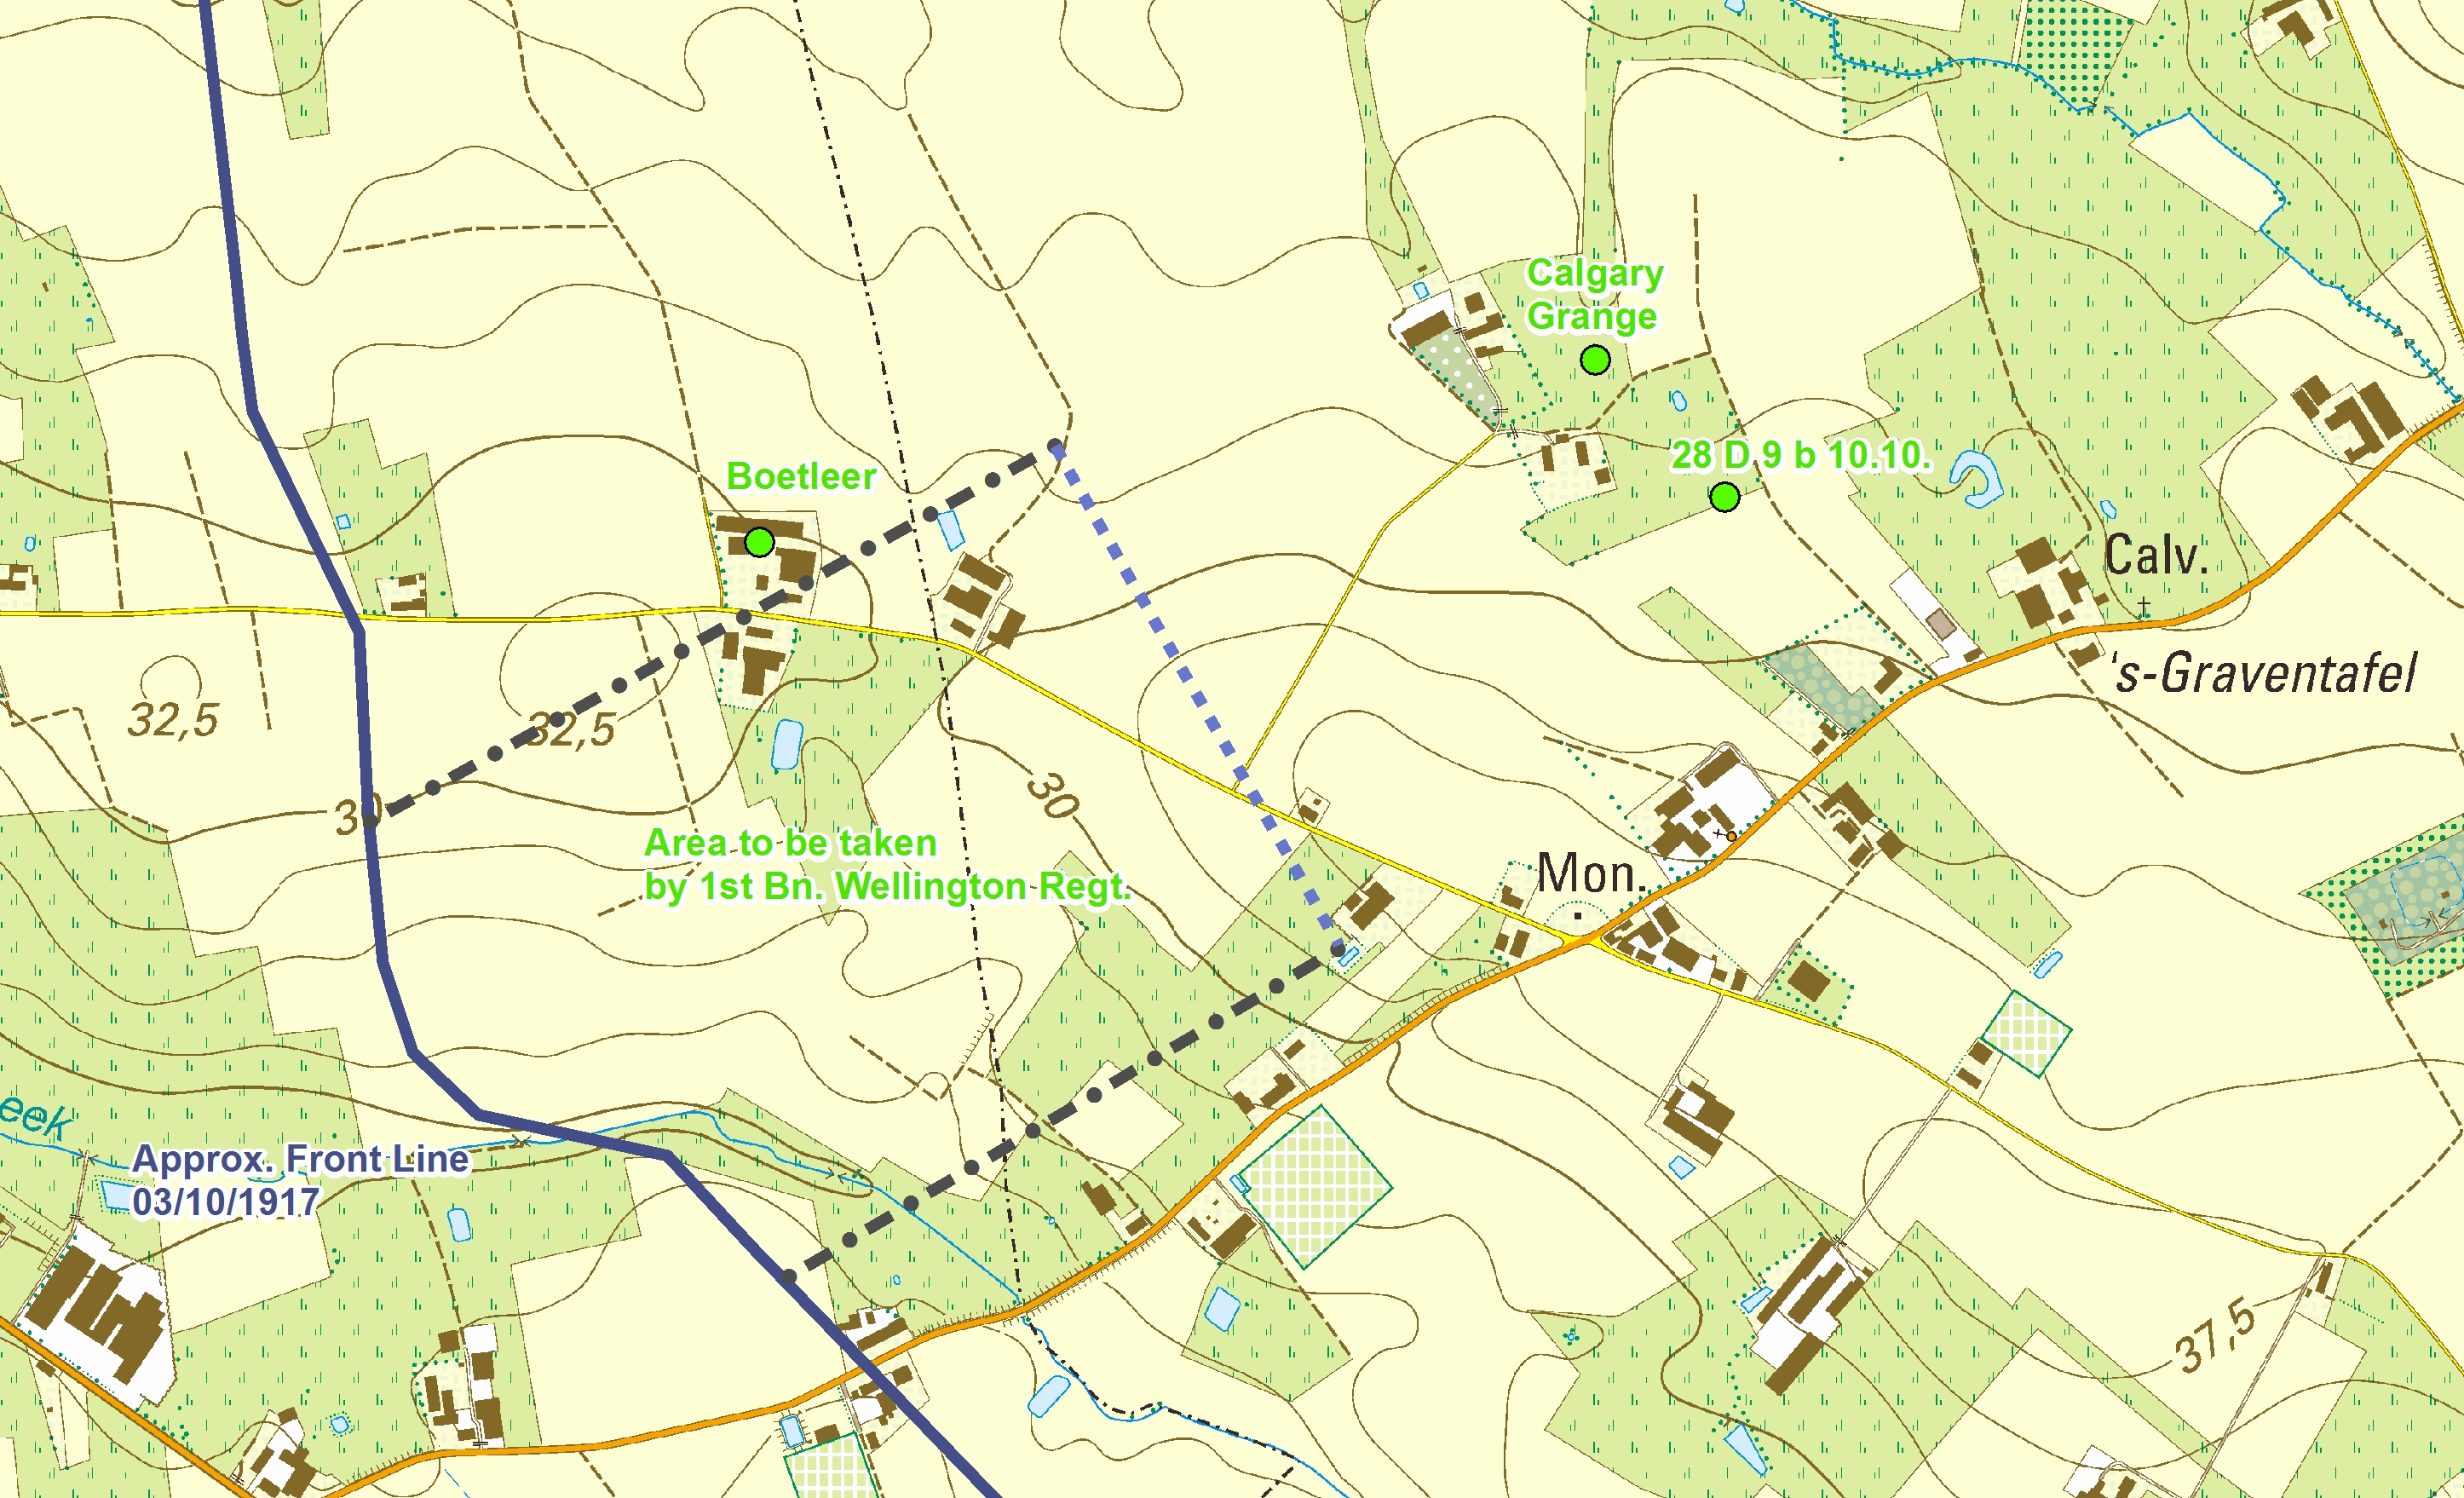
On the evening of the 2nd October the 4th and 1st New Zealand Brigades moved up from Ypres to the frontline in front of the hamlet of Gravenstafel. Each Brigade disposed two Battalions in the frontline. The 1st Brigade was positioned on the left of the Divisional front. The Brigade took over the front positions with the 1st Wellington on the right and the 1st Auckland on the left. The 2nd Auckland was in support, and behind the latter the 2nd Wellington. The 2nd Brigade Machine Gun Company remained in the line and two Battalions of the 2nd New Zealand Brigade (1st Canterbury and 1st Otago) were also left in the forward area as reserve troops for the 4th and 1st New Zealand Brigades. The New Zealand Division attacked on the 4th of October 1917, in what is known as the Battle of Broodseinde.
Zero hour was 5.25 a.m. The allied artillery put down a heavy barrage, which creeped forward all along the Divisional front. The two New Zealand Brigades moved forward behind the barrage. In a few moments after the men advanced from their positions, the Germans put down a Machine Gun barrage, which enfiladed the Zonnenbeke-Langemark road. The German artillery fired back and continually shortened range as the advance progressed. However, the barrage fell mostly in the rear of the leading Battalions. The Battalion had to cross the Hanebeek, a small stream which ran through the battlefield. The unceasing shelling had made the original course of the stream unrecognizable and had dammed its flow. The streams in the whole Passchendaele area, which served as irrigation canals, were utterly destroyed by the artillery fire and the rainwater had no way out, converting the low ground in a morass. After crossing the boggy ground at the Hanebeek, the 1st Auckland had diverged too far to the North. They cleared the German pillboxes around Aviatik Farm and Dear House with hand grenades and trench mortars. The left flank of the 1st Wellington had to keep up with the 1st Auckland and encountered strong resistance from German pillboxes at Boetleer. The 1st Wellington cleared and captured these pillboxes an carried on to the Red Line, their first objective, on the Gravenstafel rise. However progress was hindered by German machine guns. These machine gun positions had to be silenced one by one. The Battalion pushed on to the Red Line, clearing the whole Brigade area of German machine gun positions, which were often captured by close combat. When the Battalion reached the crest of the 's Gravenstafel rise, the right company was met by machine gun fire from two dugouts at Korek. Although the dugouts were 120 yards beyond the Red Line, they had to be silenced to consolidate the Red Line. The 1st Auckland on the utmost left of the Divisional front kept on diverging to the North, as they went along silencing German machine gun positions, who were harassing them on their left flank. The 1st Aucklands then captured the German strongpoints at Winzig, Albatross Farm and Winchester. As the 1st Aucklands strafed to the North, the left Company of the 1st Wellington captured the original Auckland objective. There was now a gap between the two 1st Wellington companies in the Red Line, which had to be filled by the 1st Wellington company in support. The Line was reinforced with the 4th 1st Wellington company, which had been in reserve, later on the day. By 10 a.m. the 1st Auckland also moved into the Red Line and started consolidating their positions. While the 1st Wellington and Auckland cleared and consolidated their objective, the remaining Battalions of the Brigade moved through the Red Line. The 2nd Auckland and the 2nd Wellington took up the advance and captured the opposing German Battalion Headquarters in a group of pillboxes known as “Waterloo”. The Aucklanders went on through the ruins of Korek, which had already been cleared by the 1st Wellington Battalion. The 2nd Wellington met resistance from Kronprinz Farm, but went on to consolidate the Blue Line, the Brigade’s final objective.
Private Forde Norman Arthur was killed on the 3rd October, the day before the attack. But on his service record it is reported by Capt. Adj. J. T. Dallinger on 18th February 1918 that Pte. Forde was buried at Zonnebeke 28 N.E.1.D.9.b.1.1., which is near Calgary Grange. This is between the Red and Blue Line, beyond their objective, in the area that had to be taken by the 2nd Battalion Auckland Regiment. That could mean he died during the battle on the 4th of October. His body was never recovered. Pte. Forde is remembered on the NZ Apse on the Tyne Cot Memorial to the Missing.
Connectie's met andere militairen 1
|
Hugh Douglas Forde
Brother |
Bronnen 3
|
Cunningham W.H., Treadwell C.A.L., Hanna J.S., The Wellington Regiment N.Z.E.F. 1914-1919 (Uckfield,The Naval&Military Press, Ridgewood Industrial Park,NN), p. 214-223. Gebruikte bronnen |
|
Gray J.H., From the Uttermost Ends of the Earth. The New Zealand Division on the Western Front 1916-1918 (Christchurch, Willson Scott Publishing, 2010), p. 257-270. Gebruikte bronnen |
|
McCarthy C. The Third Ypres Passchendaele. The Day-by-Day Account (Londen, Unicorn Publishing Group, 2018), p. 99-101 Gebruikte bronnen |
Meer informatie 5
|
Commonwealth War Graves Commission Database https://www.cwgc.org/find-records/find-war-dead/casualty-details/847532 |
|
Namenlijst (In Flanders Fields Museum) https://namenlijst.org/publicsearch/#/person/_id=53160e71-8408-447a-a32e-d55704a33653 |
|
Lives of the First World War (Imperial War Museum) https://livesofthefirstworldwar.iwm.org.uk/lifestory/7174604 |
|
Online Cenotaph (Auckland Museum) https://www.aucklandmuseum.com/war-memorial/online-cenotaph/record/c5010 |
|
The NZEF Project (UNSW Canberra) https://nzef.adfa.edu.au/showPerson?pid=84237 |