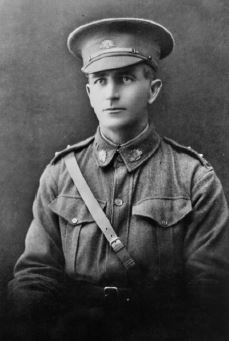
Lt
Benno Carl Lehmann
Informationen zu Geburt
|
Geburtsdatum: 06/12/1879 |
|
Geburtsort: Maitland, South Australia, Australia |
Allgemeine Informationen
|
Beruf: Schiffsingenieur |
Informationen zum Armeedienst
|
Land: Australia |
|
Truppe: Australian Imperial Force |
|
Rang: Leutnant |
|
Dienstnummer: / |
|
Einberufung datum: 16/09/1915 |
|
Einberufung ort: Fremantle, Western Australia, Australia |
|
Einheiten: — Australian Machine Gun Corps, 3rd Coy. (Letzte bekannte Einheit) |
Informationen zu Tod
|
Sterbedatum: 21/09/1917 |
|
Sterbeort: Clapham Junction, Zonnebeke, Belgien |
|
Todesursache: Im Kampf gefallen |
|
Alter: 37 |
Gedenkstätte
|
Ypres (Menin Gate) Memorial Tafel: 31J |
Auszeichnungen und Orden 3
|
British War Medal Medaille |
|
Military Cross Medaille — 17/08/1917 |
|
Victory Medal Medaille |
Punkte von Interesse 3
| #1 | Geburtsort | ||
| #2 | Einberufung ort | ||
| #3 | Ort des Todes (ungefähr) |
Meine Geschichte
Benno Carl Lehmann was born in Maitland, South Australia in December 1879. His father, Emilius Heinrich Friedrich Lehmann, was a businessman, of German descent. His mother Auguste Henriette Hoff, was the daughter of immigrants from Hannover, Germany.
Benno was married to Eliza-Jane Mc Ilwaine and worked as a Marine engineer in East Fremantle, Western Australia. Benno enlisted in the Australian Imperial Force in September 1915. At the time he had already served over six years in the 11th Garrison Artillery, based in Fremantle. This explains why Benno joined the 3rd Company of the Australian Machine Gun Corps, as a lieutenant. The company, was part of the 3rd Brigade, of the 1st Australian Division.
On the 20th of September 1917, the first day of the Battle of the Menin Road Ridge, the 1st Australian Division advanced at 5.40 a.m. with two Brigades. The 2nd and 3rd Brigade. Benno’s Company would cover the attack of the 3rd Brigade and would act in case of a German counterattack.
The 3rd Brigade began the attack with the 11th Battalion and the 12th Battalion in support. Once they had captured and consolidated the first two objectives, the 10th and 9th Battalions were to advance on the third objective.
Moments before the attack the 3rd Machine Gun Company positioned itself on the flanks of the 12th Battalion. When the German artillery started shelling the assembling troops, the 3rd MG Coy. moved forward and took up positions in shell holes and a trench running along the west side of Glencorse Wood. They remained here until their own barrage opened at approximately 05.45 a.m. The company rushed forward, mixed with various infantry units. The 12th Battalion advanced along a trench near the Red Line and took out a German Machine Gun crew with hand grenades.
On their arrival at the Red Line, just east of Glencorse Wood, the 3rd MG Coy. placed their Machine Guns in positions to guard the flank of the 12th Battalion. Lieutenant Lehmann reported that one position west of the Nonne Bosschen, was unapproachable owing to water surrounding it. Lieutenant Lehmann had two Machine Guns positioned in the vicinity at J.8.D.9.7 and J.8.D.9.2. just East of the Nonne Bosschen. Company Headquarters were established at J.9.C.1.4 in a captured block house.
While the 3rd Company was consolidating the Red Line Lieutenants Jamieson and Cornwell, of No. 2 Section, were wounded while establishing their machineguns in the vicinity of the Blue Line, the second objective at the Western edge of Polygon Wood.
Lieutenant McLeod was sent forward with as many men as he could, to reinforce No. 2 section. At 10.55 a.m. he had positioned himself with two machine-guns and one captured German machine-gun, on the Blue Line. By that time the 10th and 9th Battalions had managed to capture the third objective, the Green Line in Polygon Wood.
At 16.00 p.m. two more machine-guns were sent forward to the Blue Line. The following day another machine-gun was sent to Polygon Wood to cover the Green Line.
At 17.00 p.m. on the 21st of September 1917 the commanding officer of the Australian Machine Gun Corps, 3rd Company received a report that section officer Lieutenant Benno Carl Lehmann had been killed. The machine-guns of Lieutenant Lehmann were brought to the Red Line and were held in reserve at the Coy. HQ.
The consolidation of all the gun positions proved to be difficult. The company had a hard time to establish a position ‘protected’ from German shell fire. Especially the guns on the left flank of the Red Line were repeatedly shelled. According to his Batman Private Last, Lieutenant Lehmann was slightly wounded by shrapnel. When they were heading to an Advanced Dressing Station Lieutenant Lehmann took a direct hit from a German shell, killing him instantly and wounding Privat Last. Private Last, who was badly wounded claimed they weren’t able to burry Lieutenant Lehman.
According to another witness, Private J.A. Madden, the Lieutenant was wounded in the attack on the 20th of September. He went to a Dressing Station on the 21st together with his Batman. When Lieutenant Lehmann and his Batman returned Lieutenant Lehmann was hit by a whizzbang, a shell fired from light or field artillery, in the chest. Lieutenant Lehmann was immediately killed and his Batman was gravely injured and evacuated. Pte. Madden claimed that Lieutenant Lehmann was buried in Glencourse Wood. He also added that although Benno was German by birth and had a sister in Germany he was much liked and admired in the company.
A last statement was made by Lieutenant A. Baker Finch, Adjutant of the 1st Australian MG Company. He stated that Lieutenant Lehmann was wounded on the 20th of September 1917 and that he came to the Dressing Station at Clapham Junction to obtain an anti-tetanus shot. He refused to be evacuated and was one his way back to his gun section in positions near Glencorse Wood when he was hit and killed. He was buried by Lieutenant Hawkes, Lieutenant Martin and Lieutenant A. J. Wood of the 1st Australian MG Company near Clapham Junction. A rough cross was erected over his grave by these officers.
A month prior to his death Lieutenant Lehmann had been awarded the Military Cross for conspicuous gallantry and devotion to duty. During a German counter-attack in France he brought his gun into action at great personal risk. On seeing his gun in danger of being captured he led a bombing attack, and though twice wounded, remained until the Germans were repulsed.
Quellen 3
|
3rd Australian Machine Gun Company, (Australian War Memorial, Campbell (AWM), AWM4 24/8/19). https://www.awm.gov.au/collection/C1338583 Verwendete Quellen |
|
First Australian Imperial Force Personnel Dossiers, 1914-1920 (National Archives of Australia, Canberra (NAA), B2455, LEHMANN B C). https://recordsearch.naa.gov.au/SearchNRetrieve/Interface/SearchScreens/NameSearch.aspx. Verwendete Quellen |
|
McCarthy C., The Third Ypres Passchendaele. The Day-by-Day Account, (London, Arms & Armour Press, 1995), pg. 72-75. Verwendete Quellen |
Weitere Informationen 4
|
Commonwealth War Graves Commission Database https://www.cwgc.org/find-records/find-war-dead/casualty-details/1599105 |
|
Namenlijst (In Flanders Fields Museum) https://namenlijst.org/publicsearch/#/person/_id=40753f39-df08-48a1-aafc-92e1b31c9af3 |
|
Lives of the First World War (Imperial War Museum) https://livesofthefirstworldwar.iwm.org.uk/lifestory/7603283 |
|
The AIF Project (UNSW Canberra) https://aif.adfa.edu.au/showPerson?pid=174329 |